|
This is Revell Monogram’s latest F/A-18C kit in 1/48th, which I picked up
at Wal-Mart for $9.95, and all in all was a good build. I just got back into
building models since I was a kid, and I thought this would be a good learning
kit, being the third model I have built so far. Please forgive my lack of paint
skills and other problems, I am still learning new things, besides when I was a
kid I didn't even know what an airbrush was.
Even though I was just going to learn from it, I wanted to do the best I could
with it, and ended up taking a month and a half to finish it. I wanted to cut
and move the Flaps, Slats, Ailerons, Horizontal Stabilizers, and Rudders since
every reference photo of the Hornet parked shows these deployed. I thought about
folding the wings but passed on it due to complexity and decided to buy
Hasegawa's excellent "folding wing" F/A-18C instead (have yet to build
it). The moving surfaces separated well for the most part, (the slats were the
hardest) and went back on ok (again slats were the worst and never did look
right on one side) but there needs to be two add ons to make it right. The flaps
and ailerons are covered by a small, wing long faring that sits over the joint,
this I scratch built using Evergreen plastic sheet, and it has the added benefit
of covering up the top of the joint (hiding any errors or roughness). The other
item needed is the bulkhead on the fuselage that is exposed when the flap is
down, this I also built with Evergreen plastic. On the real thing this bulkhead
has ribs, I tried to show this by cutting into the card small channels which did
not look good and was washed out after painting. Now I realize I should have
used small plastic strips glued onto the small triangle bulkhead. Oh well, now I
know for the next time I build one. One other scratchbuilt item which is simple
but important, are the braces on the inside of the vertical stabilizers added to
all F-18's after cracks developed on a few planes. Since Revell is using an old
F-18A kit as its base, these are missing. Again Evergreen plastic came to the
rescue, I bent six small strips and glued them to the approximate location
(three on each side). Another external modification was cutting the gun holes
out and the putting plastic card under it before gluing the nose on, this gave
the gun more depth. Also I scratch built the single point refueling panel, which
was simple to make, including shelving, three black boxes, and a piece cut from
plastic tubing to make the nozzle receiver, again Evergreen plastic.
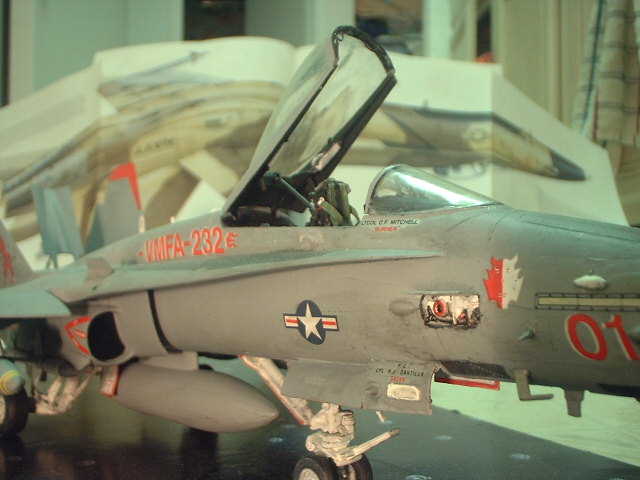
Lets take a step back and talk about the cockpit, Revell really has a nice
cockpit with lots of details but was made better by a few small additions. I
used the kit seats, which are fair, and Revell even has paper shoulder straps in
the instructions which you cut out and paint. Although the seat looks ok, next
time around I'll use one of the many aftermarket ones. The front and side panels
all have raised detail and are mostly accurate, (the front more than the side
console) and the throttle and stick are nice. The missing items that I
scratchbuilt were mostly above the side console, including ribbing, FLIR control
box with wires (even if there is no FLIR mounted, F-18s have these left in),
canopy controls and other boxes on the right side. I tried to make the compass
mounted to the front canopy, but it proved difficult, I wish someone would make
this little thing aftermarket. The rear deck is decent, but has the screen over
the avionics bay (Black Box now makes a great cockpit set for the F-18 that
includes this bay) and looks good with the canopy strut in place. The another
add on I made was the large yellow/black striped handle on the left side of the
front panel (I think it is a safety pin for the ejection system). I of course
added three mirrors to the canopy (one broke off and got lost) and two handles
made from stretched sprue. Revell did include excellent detail in the canopy
sill such as the white pistons on each side and a handle. The HUD is the only
weak part having no framing, and although I just painted the sides, I now know
that Re-heat makes a HUD set for modern jets that could have provided framing.
The only fit problems were in the rear of the fuselage halves, leaving a small
seem because of uneven width, and a gap. I minimized the size of the seam but
never quite killed it, I probably should have stuck some plastic stock into the
seam, instead of just supper glue. There was also a small seem where the intakes
met the fuselage which I thought I filled with putty, but showed up again after
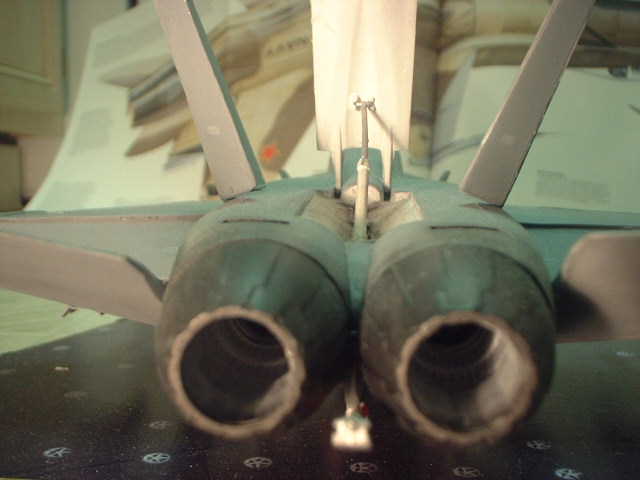
painting (always test paint over a joint!) Of note here is the closed intake
trunks which I drilled out, but be careful the landing gear bays stick up into
this area. Although my holes are not completely accurate (I wonder if seamless
suckers is on this one) it is better than having a wall of plastic inside.
The other problem in the rear of the plane is the fragile horizontal
stabilizers held on only by a small thin pole that connects the two, which I
soon broke off with simple handling of the model. Revell instructs you early on
in construction to place these in between the fuselage halves without gluing (I
think so you can rotate them like it's a toy) but this breaks way too easy as I
found out. After painting I tried to glue them on to the fuselage several times
to no avail, finally I glued short poles back onto each one and then inserted
them into them holes, this finally held and worked fine. So in other words if
you are going to build this kit, skip this part of the instructions, and cut
them in half (the center connecting pole), shave down the pole to fit in the
hole, and insert them when sanding and painting are done.
Another thing to do is add panel lines that are missing to the hump on top of
the fuselage, since this is a prominent location on the model and looks great
when added. Next time around on this kit, I will scribe a lot more lines, but I
tried to do some of the more visible ones such as the refueling probe on the
nose. This was my first time doing this, and my first time doing a wash into the
panel lines but I think it was well worth it. Revell/Monogram likes to do raised
panel lines or none at all, like on the hump, but they sure do a great job with
rivets and bolts so be careful not to sand these off. I have a Revell 1/48 A-10
I will be building, and this is a great example of nice Revell rivets since the
real A-10 is full of them.
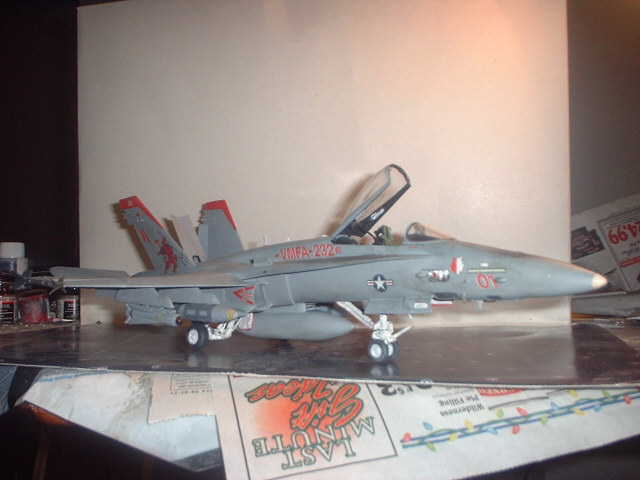
The paint was all Testors enamels airbrushed on and was finished with a flat
acrylic. The major problem I had panting was the demarcation between the upper
surfaces (Dark Ghost Grey) and lower surfaces (Light Ghost Grey) was very faint
due to the paints similar colors. This is the proper paint scheme, but even when
I did a hard demarcation (with tape) it still blended too easily, the only place
it looked right was on top of the nose.
The decals gave me a lot of trouble, I liked the bright colors and they
looked good at the store, but proved very fragile. They are made by Eagle Strike
Productions, I think they were old, and they were made in Mexico. I even had to
use a second set of wing walks from another sheet because the first had so many
rips in it. No amount of decal set and solvent made things better. Amazingly,
the only one that was easy was the big two part devil on the tail (although it
was slightly off scale). When I was in the store the other day, I saw that
Hasegawa has now issued a kit with these markings for VMFA-232 (although the
devil on the tail was slightly different). If you like these markings, that
might be the better way to go.
Weathering was done with black pastel chalk dust around the gun on the nose,
and watered down Tamiya Acrylic (color smoke) on the underside tail section, to
simulate the staining that Hornets get (I think from dumping fuel).
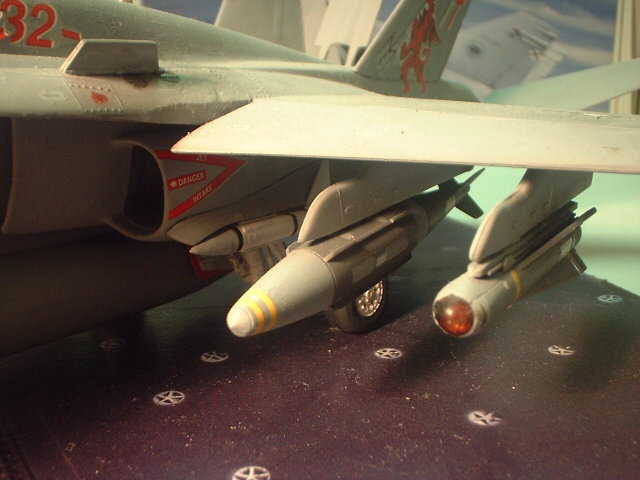
The last touch I added was the weapon loadouts, somewhat typical of recent
Hornets flying over Kosovo or Iraq. All except the kit sidewinders came from
Hasegawa weapon sets (missiles and guided weapons) included GBU-31 JDAMs, AGM-45
Mavericks, and AIM-7 Sparrows (I wanted the Nighthawk FLIR pods but no one makes
it, and I am saving the one that comes with the Hasegawa F-18 for that kit). I
painted the JDAMs grey since the Navy is now coating all bombs in a grey
anti-fire coating, even though I have since seen green JDAMs on F-18s. The
mavericks also were modified, first by cutting the triple ejector racks into
single rails, since due to problems with triple ones all services are using
single rails. I also painted the clear nose piece a milky red to make it look
like an Infra Red Maverick, for this I used Tamiya smoke and Testors Clear Red
mixed on the part (because one is an enamel and the other acrylic, they didn't
really mix, giving the "milky" effect).
All and all, this is a great kit and I would recommend it. For a sixth of
Hasegawa's F-18, you get a decent model that only has a few fit problems and
raised panel lines. There are lots of aftermarket parts for this kit and even a
Black Box cockpit will help make this kit a beauty. This is not to say that the
kit needs a lot of help, but with extra work can be a really nice Hornet!
Everett
(click on
the image below to load the full size photo)
(use your
back button to return to this page after viewing full size photo)
|
|