|
When
I joined my present Model Clubs
just a few years ago, the Kingfisher was
languishing
in a cardboard carton along with a pile of other models which had all been built
by my son in his younger days. This carton has
been a major source of supply of model
projects for me, and includes some models which are now quite rare. In
those days, there was only tube glue, which after some years allows models to be
cracked apart reasonably easily without too much damage
to be built up all over
again, hopefully to a better standard. The Kingfisher came apart
relatively well and all the traces of tube glue were able to be removed
prior to stripping the paint by
soaking in oven cleaner.
Now
that I was a member of a Club, just re-assembling it was no longer
an option. At least it needed the canopy open with the cockpit
given some detailing, seat belts, detailing of the rear cockpit etc etc,
attention paid to the assembly and finishing, trying to put into practice
some of the techniques I had learned of from other Club members.
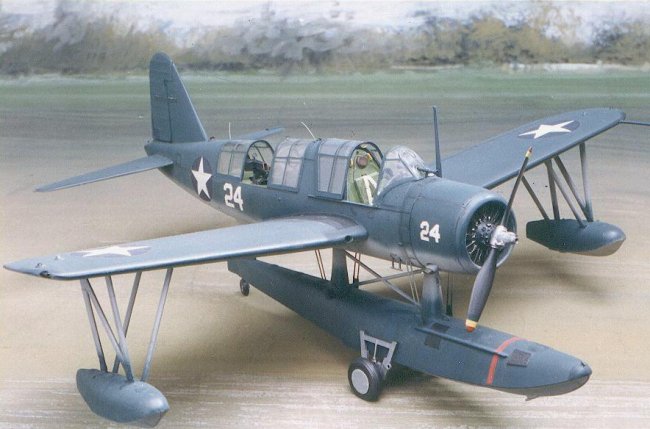
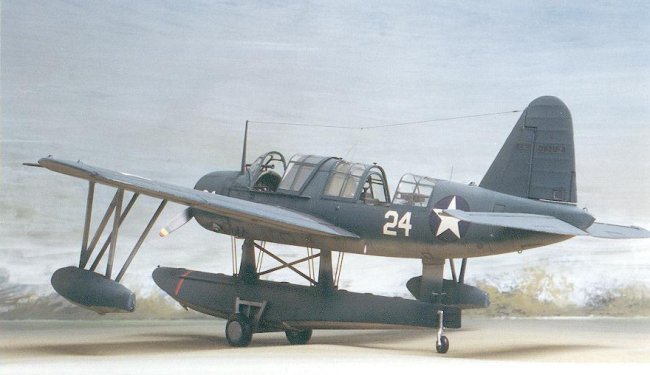
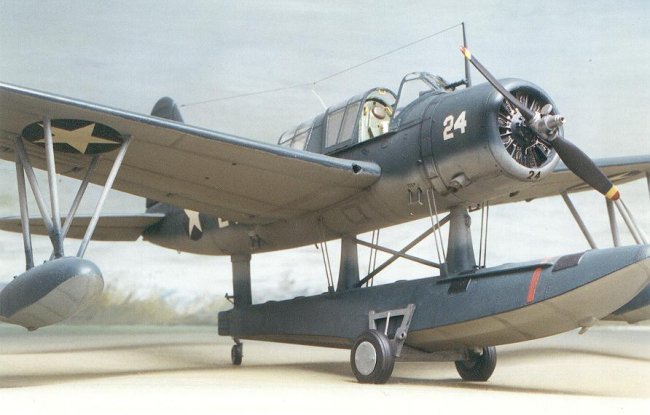
Fuselage
Prior
to joining the fuselage halves, some detail of frames and stringers was added to
the insides of the front and rear cockpits ,and a floor added in the rear as
well.
There
are some fairly prominent bracing
wires running from the float to the fuselage, which were added using
fine wire loops which were
knotted and superglued in place to keep them taut. Small tie down /
handling loops on the rear fuselage and rear ends of the wing floats were cut
off and replaced using small gauge
fishing line inserted into two holes and pushed in until it formed a loop of the
right size, then superglued in place. The rear gun was detailed with
handles and sights and a D/F loop made from wire.
The
retractable boarding steps in the kit were rather thick and clunky, so were
replaced with scratchbuilt ones made from card and slightly thicker fishing line
and being flexible, they are less susceptible to being broken off during
handling. The moulded in seat belts were fitted with scratchbuilt buckles
made from fine wire and the telescopic sight drilled out.
(Some
handles were added on the bulkhead behind the pilot's seat. These were
added from memory. Late in WW11, as
just a kid, I had come across a
wrecked OS2U fuselage in a nearby
RAAF dump and was able to get into the cockpit with the aid of handles so
placed. I've not been able to confirm whether they were fitted in all OS2U
aircraft, but they sure were in that one, so I added them
anyway.)
A
new instrument panel was made as well as a throttle quadrant, a new control
column and rudder pedals and the whole interior painted, after which the two
fuselage / float halves were joined, all seams filled and smoothed.
The
engine is moulded integrally with the cowl front, but new pushrods from wire and
ignition leads were added and have improved the appearance somewhat with careful
painting. New exhaust pipes were added using softened Aluminium tubing.
The
antenna lead and lead-in and whip aerials were added referring to photos.
A
mooring cleat added to the nose of the main float referring to photos.
Wings
The
lower surface had been moulded in one piece, but to ease assembly, it was cut in
half so that the halves could be assembled
and join lines smoothed before joining to the completed fuselage.
Wire dowels were fitted to aid the
locating of the inboard ends which met on the
centre line of the fuselage.
Each
wing float with supporting struts was
assembled and set aside for fitting at a later stage following painting and
decalling and the beaching trolley also assembled.
Tailplane
The
elevators were cut away and re joined slightly drooped and set aside for fitting
later. This task was quite difficult owing to the extremely brittle nature
of the plastic.
|
Click on
images below to see larger images
|
|

|

|
Canopies
The
framing was painted by hand and any excess paint outside the frames cleaned off
using a matchstick sharpened to a chisel point.
(This
method makes framing easy and quick on injection moulded canopies, when Acrylic
paint is used. It's not as useful on vac formed / home moulded canopies, as the
frames are not as clearly embossed, so masking and spraying is usually the way
to go.)
Small
details were added to the canopies as seen in photos.
Finishing
When
first built by my son, just generic stars and bars had been used over a blue
above
/ white unders. Wonder of wonders, I located the original kit box which showed the box art.
Inside were the parts for the landplane version still on the runners AND the
original decal sheet looking
decidedly shabby and faded.
Following
airbrushing of the blue / white overall scheme and a coat of gloss to assist
decal adhesion, it was time to see if they could be used. After all, they
couldn't be much over 25 years old! However, test soaking one
of the markings which wasn't to be used in warm water brought no sign of release
from the backing, even after several hours.
Further
testing revealed that after about 10 mins soaking in water which was
just about 70 Deg C, the
subjects could be carefully peeled off the sheet. They were then placed on
a piece of clear decal sheet which had been soaked and the film removed, in
order to give a coat of adhesive to the back of each subject.
In
this way, it was just possible to finish the model in the kit markings.
I
knew nought about weathering, but tried
to simulate some wear and fading of the finish. Some details were
accentuated by a very dilute solution using
Artist's black watercolour. When satisfied, a coat of Flat varnish
was applied overall, to seal the decals and the weathering efforts.
Conclusion
Whilst
the finished article may not exactly be perfect, it certainly let me try out
some of the hints and tips I had learned at the Club.
Others
may judge how successful or otherwise the efforts were, but there's no doubt in my mind that it
turned out a whole lot better the second time around.
Allan
|