|
|||||||||||||||||||||
|
|
|
|||||||||||||||||||||
|
|
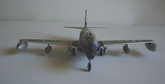
Model: Next came the fuselage halves... and the wings. I didn't gave a lot of attention to the cockpit because with the canopy closed you wouldn't see much inside... besides I was making this model to test some tips give from ARC's readers. I've learned a lot with this "baby". OK... next....lot's of Tamiya Putty and sanding... painting, Tamiya Putty, Sanding.. etc...etc... 2 weeks later...
Painting.
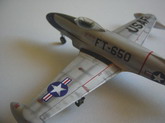
Ok, so far so good... I cut all
decals and letters... and they looked fine. I let it dry and then I
applied a Flat coat of Marabu mixed with turpentine. This gave it a really
nice flat finish and it dries very fast. Then I notice that the decals
were silvering... Panic... ok I'll give it another coat of Flat and it looks
better but... to be honest I let it be just like it was... for me to remember
the mistake. I then touched-up some paint... and applied some black
chalk pastel in the airplane. The result is what you see in the
pictures... I must admit that the plane looks better in the pictures. Ricardo Verissimo
|
|
Photos and text © by Ricardo Verissimo