|
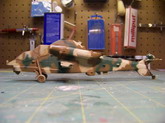
This is ScaleWorx's 1/72 SAAF Denel
CSH-2 Rooivalk multi-media kit, which was built mostly out of the box (a side
note on the designation- the designation for the Rooivalk was changed from CSH-2
to AH-2). Molded in blue resin, there are around sixty five parts,
plus two vacu-formed canopies, a photo-etched fret, and a small decal sheet.
For a breakdown of the kit and its contents, see Tim Verekee's in-box review
over a Scale Rotors.com here- http://www.scale-rotors.com/news-reviews/scaleworx/csh-2-rooivalk-sw72-01.
Packaging was excellent and the parts well protected (none of the parts in my
kit were damaged). The smaller parts were grouped together in multiple
zip-lock baggies, and the larger parts wrapped in bubble wrap, all enclosed in a
sturdy flip top cardboard box. The casting of all of the parts were smooth
and well refined, with only a few bubbles here and there (which were easily
removed with a hobby knife or sanding stick), and nice petite engravings where
needed. The six page instruction sheet has three exploded view diagrams
which show the major assembly sequences and locations of the various fuselage
bits (there are a few vague areas, so have some photo references handy), plus a
two-view color profile for the painting and decal guide. Top and bottom
view photo references will be needed for the upper and lower fuselage camouflage
pattern. A few scratch-building supplies such as brass rod and styrene rod
will be needed, as you'll need to pin some of the major assemblies for added
strength. As with most resin/limited run kits, the joints are of the flush
type with no tabs/pins for positive location. Some of the rotor
linkages/components need to be scratch-built from brass rod or small gauge wire
as well. The resin in this kit is easy to work with in terms of the
removal of the parts from the pour gates and clean up. A razor saw was
used for the larger parts, while a hobby knife was used for removing the smaller
pieces from their gates (a few passes with the back edge of the knife blade did
the trick). The seams and gaps were easily removed, in fact much easier
than on a styrene kit (just go slowly, sanding too fast will result in misshapen
parts and unwanted voids). I used Model Master Red Glazing Putty for large
areas, Micro Mark Crystal Clear white glue for spot filling, while Gunze
Mr. Surfacer took care of all of the seams. Assembly started with joining
the fuselage halves. The fit here was great out of box, but I some how
botched it when I epoxied the halves together which resulted in a large step
over most of the length of the lower seam. I used some styrene strip to
level out the seam, and then filled over it with glazing putty. Next you
add the cockpit, which consists of the tub, blast shield, pilot and WSO
seats (with photo-etched ballistics shields), cyclic and collective controls,
instrument panels (which have very fine engraved detail), and the WSO controls.
Be sure to add the blast shield "glass" between the two cockpits by
filling in the opening with clear acetate or Testors clear window glue (which I
used). The cockpit was painted black and some minor detail painting done
to bring to it to life. After the cockpit was assemble and painted, I
added the stub wings, aft end of the tail boom, and the rotor pylon to the
fuselage. The rotor pylon was another area that I messed up while epoxying
it in place and required some extra work to fix (I didn't watch it closely as
the epoxy cured). Upon closer inspection the pylon ended up crooked from
the front, which would have resulted in the rotor sitting crooked as well
(resulting in a very wonky frontal view). There was no way I could pop the
join without substantial damage to the model so another solution was necessary.
I cut a slot three quarters of the way through the pylon with a razor saw,
wedged some styrene shims into the slot to level out the top of the pylon, and
then puttied over the area and sanded it smooth. I obliterated the molded
cooling vent detail on the front of the pylon, so a photo-etched grille from a
NASCAR cooling duct set was used to replace that vent. The biggest hurdle
to overcome assembly wise is the fit of the canopy. Extreme care is needed
when trimming it to fit the fuselage to insure a good fit, and to make sure it
sits correctly as in being level all around. I messed up the first canopy,
so thank you ScaleWorx for including a second one! The rest of the
assembly involved adding all of the various resin and photo-etched fuselage
bits. There are guides engraved into the fuselage which aid in the
placement of the all of the RWR antennas and other sensor bumps. Masking
the canopy was the next item to deal with. There was just a bit of a hint
framing to go by on the canopy so photo references were needed to get the exact
widths of each section (the side windows do bulge out on the vac-canopy, so that
was helpful in determining the frame borders there). I used thin strips of
blue painter's masking tape to delineate all of the framing, while Scotch Tape
and Bare Metal Foil were used to mask the windows themselves. Be sure to
spray a coat of black paint over the framing before applying the primer and
airframe colors. The main landing gear, tail wheel, and photo-etched
antennas were the last items to add before painting commenced. The longer
main gear struts will need to be pinned in place on the fuselage with two
flat-head sewing pins. With most of the major assembly done, a few coats
of gray primer were applied to check for flaws and give the model a uniform
color to paint over.
Click on
images below to see larger images
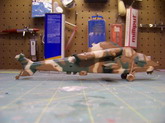
The most time consuming aspect
of building this model was applying the camouflage scheme. The
Rooivalk carries a complex three-tone wrap around scheme of sand, dark
brown, and dark green (which is also used on the SAAF's Agusta A109
utility helicopters). ScaleWorx recommends using Humbrol Hu121 Pale
Sand, Hu29 Dark Brown, and Hu30 Dark Green for the camouflage scheme.
The camouflage was applied freehand, with an airbrush that came with an
air compressor that my wife bought for me years ago. I have been a
die-hard Aztek user up to this point, but it broke prior to painting this
model so I had use the no-name one. I am pleased with how well it
worked. After the painting was completed and the canopy masks
removed, I used thin black dry transfer striping to add the thin black
borders around the side windows (near as I could tell, the upper panes of
glass do not have those borders around them). The
markings on my model are a mixture of kit decals and the South Africa
national flag markings from a 1/72 Revell Agusta A109 'SAAF' kit (mine is
marked in the current configuration while the kit decals reflect an
earlier markings set up). The kit sheet contains the current and
former SAAF roundels, 16 Squadron crest, SA national flag, and some
airframe stenciling. Printed on a continuous carrier sheet, you'll
need to trim the markings as close as possible to the image. The
images were in register and had good color depth. They are also a
bit on the fragile side so extra care is needed when applying them.
Most of the fuselage detail painting was completed as this juncture
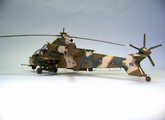
(navigation lights, antennas, etc). The rotors and weapons
were assembled and painted next. The main and tail rotor
blades were all drilled out and pins added to the roots before joining
them to their respective rotor-heads assemblies (which were drilled to
receive the pins). Brass rod was used to replicate the main rotor
pitch-change links and the tail rotor shaft. The Mopoka anti-tank
missile racks were pinned together and the eight missiles CA-glued into
place, and then hung on their respective hard points (as were the FFAR
pods and Mistral missile launchers). I used Model Master Medium
Green FS34102 for the rotor blade and ordnance color, while Humbrol Hu27
Gray was used for the rotor heads. At this point the nose cannon,
ammo chutes, and TADS pod were epoxied into place. The main and tail
rotor blade anti-corrosion strips were masked and painted Model Master
Aluminum Metalizer and then rotors added to the model. The last item
to add was the rotor cap and ADS mast, and with that, my Rooivalk was
finished.
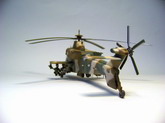
Overall I found ScaleWorx's Rooivalk
relatively easy to assemble and a very enjoyable experience to build (which says
volumes on the quality of the kit considering this is my first full resin kit
build). The end result is a very unique model of a very unique helicopter.
The fitting and masking of the canopy was about the most difficult aspect of the
entire building process, but taking your time while trimming, sanding, and
blending the canopy into the fuselage will alleviate any potential fit issues
(kind of a rule of thumb in general when it comes to model building). The
other issues I mentioned were of my own making, but nothing that was/is
insurmountable to resolve, especially for those who do have experience with kits
of this type. Due to the nature of this kit and the complex camouflage
scheme, beginners should wait until they have worked with enough photo-etch
parts, extensive resin conversion sets and develop their airbrushing skills
before tackling ScaleWorx's Rooivalk, however I have no problem recommending
this kit to those with multi-media kit and/or extensive resin conversion set
experience.
I would like to thank John Weideman of ScaleWorx for not only providing
the review kit, but for also providing the references needed to complete this
model, the advice when I ran into trouble areas, the patience when I dragged my
feet in getting this done, most of all, the encouragement when I had doubts in
my ability to see this build to its completion.
Some useful links of interest on the Denel AH-2 Rooivalk;
Albert Moore
Click on
images below to see larger images
|
|