|
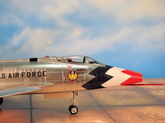
For your viewing pleasure, here are some photos of my 1/48 scale Trumpeter F-100C dressed up in the livery of the Skyblazers.
Beginning in 1949, through 1962, the USAF flew an Air Demonstration Team called the “Skyblazers”.
The team put on air demonstration in the skies over Europe.
During this period the “Skyblazers” flew a number of different aircraft including: the F-80B, the F-84E, the F-86F, and the F-100C. From 1957 to 1961, the “Skyblazers” flew the famed F-100C Super Sabre Jet.
However, during this time a new demonstration team based in the U.S. called the “Thunderbirds” had been formed.
By 1962 the development of mid-air refueling had come a long way, and the “Thunderbirds”, flying the F-100D, were able to make the trip to Europe for demonstrations.
This eliminated the need for a team based in Europe, and the “Skyblazers” were officially disbanded.
|
Click on
images below to see larger images
|
|
|
Construction
The Trumpeter F-100D Thunderbird kit is an excellent kit to build. Lots of detail and the parts fit is very good, the two piece canopy fit perfectly.
Some seam filling was required, but nothing serious—a fairly easy build.
Painting
Skyblazer F-100Cs for the most part had a bare metal finish. For the bare metal finish, I first primed the model with a coat of Model Masters Gloss Black and let it cure for 48 hours.
For the engine area I first airbrushed a coat of Alclad II Pale Burnt Metal, followed by a light airbrushing of Alclad II Jet Engine Exhaust in between the panel lines.
For the polished aluminum finish, I airbrushed the model with two light coats of Alclad II Polished Aluminum.

Decals
When I purchased this kit I fully intended to build an F-100D with Thunderbird decals. But when I examined the decal sheets, there are two, there was a decal sheet for the Thunderbirds and a decal sheet for the Skyblazers, I went with the Skyblazer decals. The Skyblazer decals were excellent.
They are large and well printed, but on the thick side. I once read somewhere that you should never use your fingers to place decals on a model.
The decals for this kit break the rules—you have to use your fingers to place the decals because they are so large, and because they were on the thick side, there was no tearing.
Most of the decals lay down nicely with the application of a little Solvaset.
However the large decals on the tail and the nose required a number of Solvaset applications to get the decal to conform to the model.
Comments
This kit was a pleasure to build. The parts fit was very good. Cockpit and external detail is excellent, and the decals are super.
The overall quality of this kit is excellent, Trumpeter engineered a superb kit.
I was very pleased with the finished model—an impressive model.
Burt Gustafson
|
Click on
images below to see larger images
|
|
|
|
|
|