|
One of the constant complaints by many modellers is
the large number of toolings for certain subjects. "Not another
Spitfire/Me-109/F-4/F-15/Whatever." It is also one often levelled at F-16
kits, and now there is yet another entrant from Revell Germany, which has just
been re-released by Revell Monogram. But, as there are so many F-16 kits out
there, is Revell's release enough of an improvement over the competition to be
"worth it"? Absolutely. Simply put, Revell's F-16 Block 50/52 is now the
F-16 kit to buy in 1/72. It even gives Hasegawa's 1/48 release a run for the
money.
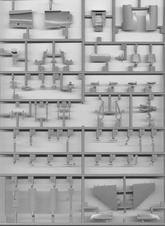
Based on their previous F-16AM, the newer boxing
contains all the parts from that release, plus a full sprue of new parts for the
C version, plus a few more surprises, such as the short chord, early stabilisers.
Out of the box and with a little creativity, it will build almost any single
seat F-16 being flown. The kit includes both parabrake and ECM tail fairings for
the A tail - a carry over from the AM release. Using either the long or short
chord stabs, this allows you to build any of the "NATO Vipers", at any
point in their history. The C parts include the longer, wider,
"normal" C fin base. A few minutes with a razor saw and file will
allow you to sacrifice the C-style fin to build a short-tailed A. Add two bulges
from sheet styrene and putty to this, and you'll have an ADF tail. A bit of
sheet styrene and putty will also allow you to scab the ECM or parabrake
extensions onto the C tail, to build Israeli, Greek, Turkish and Pakistani
F-16's. And none of these modifications should take more than about ten minutes.
The kit also comes with both Small Mouth and Big
Mouth intakes, nice renditions of both GE and Pratt exhausts, nose inserts for
either the short AIFF bird slicers (if you're picky, these may need
modifications to depict the taller style, or some of the Edwards
"bulged" AIFF arrays) or normal, smooth nose, as well as three
separate instrument panels, depicting the A, AM and C type consoles. Ordnance
includes 4x AMRAAMs, 2X Sidewinders, optional pylons (enough LAU-107's for one
complete aircraft, and LAU-128's or LAU-129's for two complete aircraft), 2x GBU-10, 2x
HARMs,
1x HTS, 2x 370gal. drop tanks (with clipped fins), 1x 300gal. drop tank, 1x
AN/ALQ-131 and gun panel inserts for both the A and C type gas purge vents. It's
a fantastic kit for building up the spares box.
Of course, the important question is, how does it
compare with the competition. In my opinion, Hasegawa's kit is really the only
other 1/72 F-16 worth bothering about, since the rest are all crude and/or hard
to find, so here we go, point by point.
Click on
images below to see larger images
Shape and accuracy:
Both are good, though Revell seem to do a better job of capturing the LERX shape - Hasegawa's is too "blended" when viewed from above. All Hasegawa F-16's are tooled with the F-16A style gun gas vent plate, which requires filling and re-scribing to (accurately) depict an F-16C. Revell includes both styles, though they can be a tad fiddly to insert. Grinding off the socket on the inside of the fuselage will help. You'll also note Revell's kit has more detail around the cockpit sills and a more accurate coaming. Hasegawa's coaming is far too narrow.
Surface detail:
It's really an issue of personal preference. Hasegawa have finer panel lines, while Revell's are slightly heavier. Hasegawa included rivet and fastener detail, while Revell's is more simplified. I personally like the looks of Hasegawa's surface detail, though others find Revell's approach easier for weathering, so it's a toss up.
Intakes:
They're different approaches, so it's a matter of ease versus appearances, mixed with personal taste. Hasegawa has a simple, "infinite intake" insert for the front of the
inlet(s). I'm not fond of the look of it, but it is reasonably easy to build, even though the fit of the parts isn't the best. Revell's intakes need a bit of Milliput to smooth out some noticeable gaps inside where the ramp meets the side pieces, though it's an easy fix, and gives a better representation of depth when finished - not perfect, but not bad. Just build up the intake, roll out two small sausages of
Milliput, press them into the corners of the intake with a paint brush handle and smooth out with a wet Q-Tip. Again, a question of preferences. One notable distinction, however, is that Revell provide both bulged Rapport III and "normal" intake lights, which lets you build, for instance, Israeli C's, as well as early Belgian A's.
Exhausts:
Revell includes actual, "deep" exhausts, which is far better than Hasegawa. The latter would have you mount the flame holder and exhaust straight to the back of the turkey feathers. Both Revell's and Hasegawa's Pratt exhausts lack petal detail on the inside, though Revell does provide some (as much as can be done on a one-part ring) on their GE exhaust, while Hasegawa's is bare. The sole criticism of Revell's exhausts is that both lack the series of rings in the external metallic fairing just fore of the turkey feathers, though it's a simple task to scribe them.
Ever decreasing stencils.
From top to bottom:
Revell US F-16C,
Revell Germany F-16C Block 50/52
Revell Germany F-16AM releases.
The decals seem to be getting worse in colour fidelity and detail. The Revell US decals aren't particularly crisp, and have a thicker, yellowed carrier film, while the Revell Germany USAF roundels are the wrong shade of grey and, for some reason, have white
centres.
Mike O'Hare
Click on
images below to see larger images
|
|